NetSuite is a powerful cloud-based ERP system that provides a wide range of features for managing business operations. One of the key capabilities of NetSuite is its ability to import data from external sources, such as CSV files, and transform it into actionable information. In this blog post, we will explore how to import CSV in NetSuite and create new employee records using a sample Excel file.
Preparing the CSV File
Before you can start importing your CSV file into NetSuite, you need to prepare it properly. Here are some things to keep in mind when preparing your CSV file:
- Make sure your CSV file is formatted Each row should represent a single record (in this case, an employee), and each column should correspond to a field in NetSuite.
- Use the correct NetSuite supports both comma-separated values (CSV) and tab- separated values (TSV). Choose the one that works best for your needs.
- Include all the necessary
- Review and clean up your Remove any duplicates or incorrect entries, and make sure everything is spelled correctly.

Navigate to the Import/Export Page
To begin the import process, navigate to the “Import/Export” page within NetSuite. To do this, follow these steps:
- Log in to your NetSuite
- Click on the “Setup” tab in the top right corner of the
- Click on the “Import/Export” tab and select “Import CSV Records”.
1. Scan & Upload CSV File
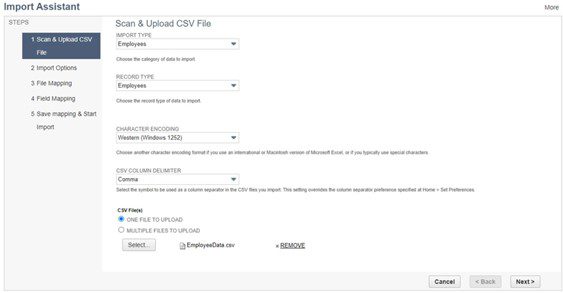
Once you’re on the “Import/Export” page, select “Employees” in Employee Type and Record Type and click the “Select” button to select your prepared CSV file. Browse through your computer’s folders until you find your file, then click “Open.” Once you’re done click on the “Next” button.
2. Import Options
Data Handling Options
- Add: This option is used when you want to add entirely new records to It will not update existing records, and any records with matching identifiers (e.g., unique IDs or names) will be skipped. This is useful when you’re importing data for the first time or adding new entries to your database.
- Update: Choose this option when you want to update existing records in NetSuite based on matching identifiers. If a record with the same identifier is found, the import will update the fields with the new data from the CSV If no match is found, a new record will be added. This is handy when you want to keep your records up to date without duplicating entries.
- Add or Update: This option combines both the “Add” and “Update” It will add new records and update existing ones based on matching identifiers. If a record exists, it will be updated; if not, a new record will be added. This is a comprehensive choice for maintaining your data integrity while handling both new and existing records.
Advanced Options
Log System Notes for Custom Fields:
Enabling this option will log system notes for custom fields when you import System notes provide a history of changes to the record, making it easier to track modifications and updates.
Overwrite Missing Fields:
If you choose this option, any fields that are missing in your CSV file but exist in your NetSuite records will be overwritten with blank values during the This can be helpful to ensure that data consistency is maintained.
Validate Mandatory Custom Fields:
When enabled, this option will enforce validation on mandatory custom If your CSV file is missing data for these fields, the import will fail, ensuring that essential information is not omitted.
Overwrite Sublists:
Sublists are lists of related records within a primary record. Enabling this option allows you to overwrite sublist data during the import. For example, if you’re importing data related to customer transactions, you can overwrite existing transactions.
Ignore read-only fields
It refers to the option to exclude fields that are marked as read- only from the import process. When this option is enabled, NetSuite will skip over fields that have been marked as read-only, rather than trying to update or delete.
Custom multi-select value delimiter
It refers to the character(s) used to separate multiple values in a multiselect In NetSuite, multiselect fields allow users to select multiple options from a list. However, when importing data into NetSuite, the system needs to know how to interpret the multiple values contained in the CSV file.
CSV Decimal Delimiter:
This option allows you to specify the character used as the decimal delimiter in your CSV In some regions, a comma (,) is used as the decimal delimiter, while in others, a period (.) is more common.
Custom Form:
You can select a custom form to use during the Custom forms may have different field layouts or additional custom fields, and choosing the appropriate form ensures that the data is mapped correctly.
Run Server SuiteScript and Trigger Workflows:
This option allows you to execute SuiteScript on the server and trigger workflows during the import process. SuiteScript is NetSuite’s server-side scripting language, and workflows automate business processes. Enabling this option can help you perform complex tasks and automate actions during the import.
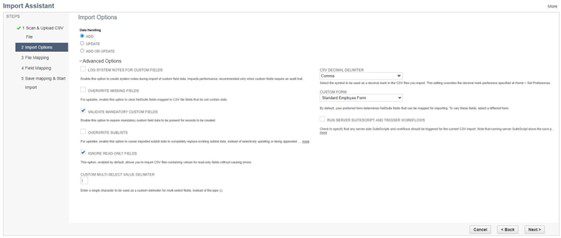
In our case, we are only creating new records and not updating existing ones. Please select “Add” in the Data Handling section and click “Next” to proceed to the next step.
3. File Mapping
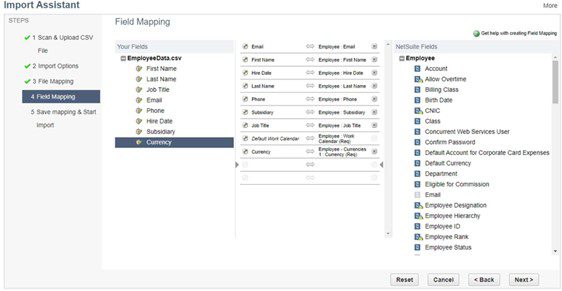
- In this step, you’ll map the fields in your CSV file to the corresponding fields in
- You’ll see a list of all the fields in your CSV file on the left side of the
- For each field, you’ll need to select the appropriate field in NetSuite from the dropdown list on the right side of the page.
- Make sure to match each field correctly, as this will ensure that the data is imported
- Once you’ve finished mapping all the fields, click “Next” to move on to the next.
4. Save Mapping & Start Import
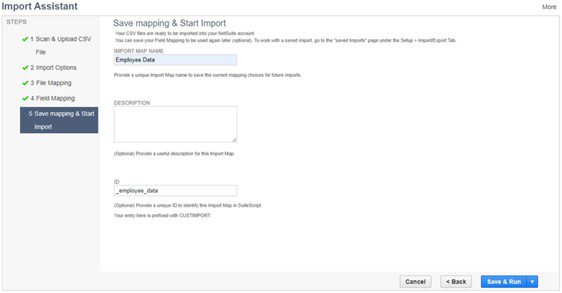
- In this final step, you’ll save the mapping configuration and start the import process.
- Click the “Save and Run” button to store the mapping settings for future use and to initiate the import process.
Check Import Job Status
NetSuite will process your import job. You can monitor the progress and check the status:
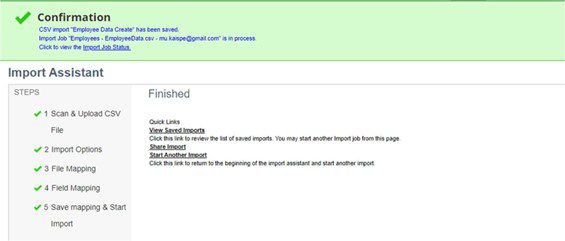
- Go to Setup > Import/Export > View CSV Import Status or you can directly click on “Import Job Status” link in confirmation message.
- You can see its status It may take some time, depending on the volume of data.

Verify Employee Records
Once the import is completed successfully, you can verify the employee records created:
- Navigate to Lists >
- Use filters or search to find the newly imported employee
- Verify that the information matches what you had in your CSV

Conclusion
Importing CSV files into NetSuite is a valuable feature that can save you time and effort when populating your ERP system with data. By following these steps and understanding the key concepts like scanning and uploading files, configuring import options, mapping fields, and checking the import job status, you can efficiently import data into NetSuite and keep your records up to date.


