Withholding is an act of deduction or collection of tax at source, generally an advance tax payment. It is an effective mechanism and an important/timely source of revenue. Their contribution is about 41 percent of total direct tax revenues. It is applied in several countries like Australia, New Zealand, Thailand, Pakistan, etc. Microsoft Dynamic 365 Business Central provides Withholding Tax (WHT) functionality for all the regions where WHT is applied.
In this blog, I will show you how to implement WHT functionality in Business Central for such localizations where WHT is not applicable and is required by the organizations using Business Central in that localization. Later I’ll show you how to use the implemented WHT functionality for a Posted Purchase Invoice in Business Central for a specific vendor.
Steps Involved:
Following are the steps involved in achieving and testing the WHT functionality.
Step-1: Create four custom tables namely “WHT Transaction Table”, “WHT Product Posting Group”, “WHT Business Posting Group” and “WHT Posting Setup”.
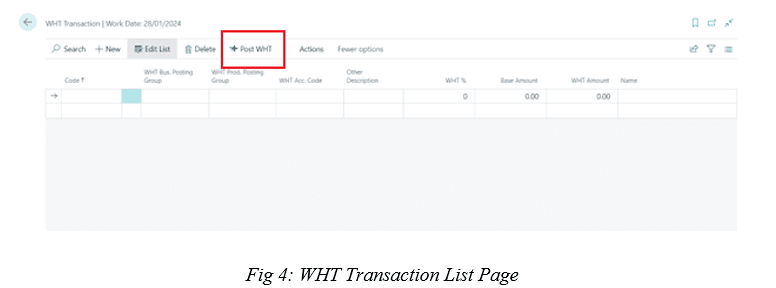
Step-2: Now for each of the above custom tables created, develop a list page as shown in fig 1, 2, 3 and 4.


In fig 4, an action (“Post WHT”) is also created on “WHT Transaction” list page that will post WHT entries on the “Payment Journal” lines.
In fig 5, an OnClosePage() trigger is called that will clear the data from the “WHT Transaction” table as soon as the “WHT Transaction” list page is closed.


Step-3: Make sure that at least one purchase invoice should be posted so that when the “Payment Journal” page is used there should be at least one posted purchase invoice on which WHT can be applied. Also, make sure that entries are applied for that invoice.
Step-4: After creating all the tables and list pages required for WHT implementation, now an action (“WHT Entry”) is created on the “Payment Journal” page by creating page extension of it as shown in fig 9 and 10.
Whenever the “WHT Entry” action is executed, it will prompt a confirmation dialog box as shown in fig 11 and if “yes” is selected then a procedure (“SetItemInfo”) declared in fig 6 will be called that will pass some values (“Account No.”, “Description” and “Amount”) from “Payment Journal” page to “WHT Transaction” list page and after that “WHT Transaction” list page will be opened as shown in fig 12.


Step-5: Now start entering values in the created list pages i.e., “WHT Posting Setup”, “WHT Business Posting Groups” and “WHT Product Posting Groups” as shown in figs 14, 15, and 16. For the “WHT Posting Setup” list page most of the fields have a table relation. Make sure that before filling the fields in “WHT Posting Setup”, a G/L account must be created (fig 13) for WHT entries in “Chart of Accounts” and then select the created G/L Account in “Sales WHT Account” and “Purchase WHT Account” fields in “WHT Posting Setup” as displayed in fig 16.


Step-6: After all the values are entered, now one page and one table extension of “Sales & Receivales Setup” is created and two fields i.e., “Journal Template Name” and “Journal Batch Name” have table relation with “Gen. Journal Template” and “Gen. Journal Batch” are added to both page and table extensions. Once these fields are created, then data is entered into these fields as shown in fig 17. Make sure that “Journal Batch Name” is the same for both “Sales & Receivales Setup” and “Payment Journal”.
The purpose of these fields will be known in the upcoming steps.

Once all the above steps are completed, then the WHT functionality can be applied to any posted purchase invoice whose entries are applied in “Payment Journal”
Step-7: Open “Payment Journal” and chose the vendor for which you have posted the purchase invoice. In my case, I have chosen “Custom Metals Incorporated” as shown in fig 18.

Step-8: Now, apply entries for the invoice that you have selected as shown in fig 19. Just select the purchase invoice you have posted and execute “Set Applies-to-ID” action (fig 20) and it will automatically populate some of the fields like “Amount” in “Payment Journal” first line as displayed in fig 21.


Step-9: After applying for entries, now execute the “WHT Entry” action discussed in step 4 which will open the “WHT Transaction” list page with some fields that will already be appended as shown in fig 22. Now when the “WHT Bus. Posting Group” field is drilled down it will give a list of WHT Bus. Posting Groups that were configured in the previous steps. Once it is selected then all the remaining fields will be auto-populated as an OnValidate() trigger (fig 7) is applied to the “WHT Bus. Posting Group” field as shown in fig 23. The “WHT Amount” field is the calculation of the “WHT %” and “Base Amount” fields.

Step-9: Once all fields are populated, then “Post WHT” is executed. As discussed in step 2 that “Post WHT” will append values from the “WHT Transaction” list page to some of the “Payment Journal” fields as shown in fig 24.
As the appending process from “WHT Transaction” to “Payment Journal” will require primary keys of “Payment Journal” i.e., “Journal Template Name”, “Journal Batch Name” and “Line No.” therefore the two fields were created in “Sales & Receivales Setup” and were used in “Post WHT” action (fig 8). For “Line No.”, an already defined procedure “GetNewLineNo()” in the “Gen. Journal Line” table (fig 8) gets the new line whenever this procedure is called.

Step-10: Once values are appended, than execute the “Post/Print” action and the amount will automatically be updated in specified accounts. The “Amount” for WHT i.e., 361.35 in my case will be updated in the newly created WHT account (“With-holding Tax”) in “Chart of Accounts” as shown in fig 25.

Hope you find this information useful.
Stay tuned for more articles about Business Central.
If you have any suggestions/questions, please comment on the post, or contact us at info@kaispe.com
Courtesy: Muhammad Anas Naeemi


