In this blog post, I will write step-by-step on how to create a new server instance and web client instance in Microsoft Dynamics 365 Business Central On-Prem. The reason why we need this is to allow clients to have separate Business Central Web client instances for the different companies of a business. The usual scenario would be to have at least two databases: one for development and one for production.
First, I create a new database called Test, and I’ll be using this database for my new server instance.
Steps:
Create a new server instance
STEP – 1 – Open PowerShell ISE as an Administrator.
STEP – 2 – Import the Business Central Module with the following command.
Import-Module 'C:\Program Files\Microsoft Dynamics 365 Business Central0\Service\navadmintool.ps1'
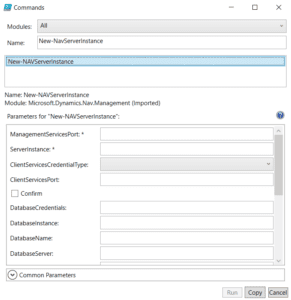
STEP – 3 – Open the command panel on the right, and use cmdlet New-NAVServerInstance to create a new server instance.

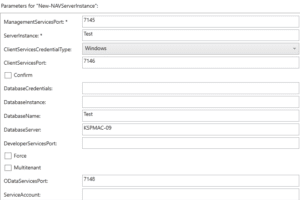
STEP – 4 – To create a new server instance, you must use different port numbers and specify some parameters. In my case, I’m using the following parameters.
- Server instance (Service Name) – Test
- ClientServicesCredentialType – Windows
- Database Name – Test
- Database Server – KSPMAC-09
- Management Service Port – 7145
- Client Service Port – 7146
- SOAP Service Port – 7147
- ODATA Service Port – 7148
- Development Service Port – 7149

You can set up other parameters like database name and server name, according to your requirement.
STEP – 5 – Click the copy button and execute the following command in PowerShell.
New-navserverinstance -managementservicesport 7145 -serverinstance Test -clientservicescredentialtype Windows -clientservicesport 7146 -databasename Test2 -databaseserver KSPMAC-09 -developerservicesport 7149 -odataservicesport 7148 -soapservicesport 7147
STEP – 6 – Start New Service with the command.
Start-navserverinstance -serverinstance Test
Create a new web client instance
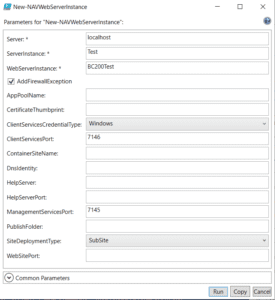
STEP – 7 – Search and use cmdlet New-NAVWebServerInstance to create a new web service instance and specify the Parameter.

- The Port used here should be the same that we used while creating the server instance above.
- You can specify the other parameters if you want to.
STEP – 8 – Click the copy button and execute the following command in PowerShell.
Microsoft.Dynamics.Nav.Management\New-NAVWebServerInstance -Server localhost -ServerInstance Test -WebServerInstance BC200Test -AddFirewallException -ClientServicesCredentialType Windows -ClientServicesPort 7146 -ManagementServicesPort 7145 -SiteDeploymentType SubSite
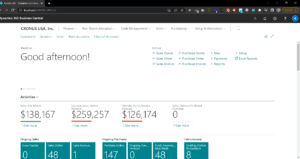
STEP – 9 – Go to the IIS Manager and browse the Web Client ‘BC200Test’ OR you can just go to the URL “http://localhost:8080/BC200Test/”

Hope you find the information useful.
Stay tuned for more articles about Business Central.
If you have any suggestions/questions, please comment on the post or contact us at [email protected]
Courtesy: Govinda Kumar


