Welcome to our comprehensive guide on converting Power Apps canvas application to Android APK with the help of Power App Wrap feature. PowerApps is a revolutionary platform that empowers individuals and organizations to create powerful and custom applications without extensive coding knowledge. With its user-friendly interface and intuitive design tools, Power Apps opens a world of possibilities for streamlining processes, enhancing productivity, and transforming ideas into functional solutions. Whether you’re an experienced developer or a business user looking to optimize workflows, Power Apps provides the tools and flexibility to bring your vision to life.
What is PowerApps Wrap
In today’s fast-paced digital landscape, organizations strive to deliver innovative and user friendly apps at an accelerated pace. To meet this demand, Microsoft has introduced a game changing feature called Power Apps Wrap. Empowering developers and citizen developers alike, Power Apps Wrap revolutionizes app design efficiency by offering a versatile canvas that seamlessly adapts to different screen sizes and orientations.
In this blog we will explore the capabilities of Power Apps Wrap and how it simplifies the development process, enabling creators to build responsive and visually appealing applications with ease. Join us as we delve into the exciting world of Power Apps Wrap and uncover the possibilities it brings to the table for building exceptional apps across various devices.
So ‘PowerApps Wrap’ functionality, which allows organizations to construct and bundle multiple PowerApps into a single native Android or iOS application. This breakthrough feature not only facilitates comprehensive branding of the application’s user experience but also enables effortless distribution through various app stores and ensures enterprise governance through Mobile Device Management (MDM) solutions like Intune.
As someone who has overseen a portfolio of native mobile apps, I was naturally eager to explore this new capability, recognizing its potential to drive wider adoption within enterprises. However, due to the limited availability of information, I took the initiative to document my process for future reference.
The following example outlines the steps involved in wrapping an application into an APK file specifically for distribution on Android devices.
PART 01: CREATE AN AAD APP REGISTRATION
First of all, go to azure portal and click on Azure Active Directory (AAD).

Now, click on App registration and then click on New Registration.

Here, on this page enter the name of the application and then click on Accounts in any organizational directory (Any Azure AD directory – Multitenant) and personal Microsoft accounts (e.g. Skype, Xbox) to make this application mulit-tenant.

Now after the creation of application go to authentication tab here you will find Platform configurations here click on Add a platform.

Select your target platform. In this case, Android.

- Specify the following details:
- Package name – which is the bundle ID, a unique identifier of your application within a platform’s app store ecosystem. A generic naming convention is com.{companyname}.{appname}
- Signature hash – enter the signature hash from KeyTool.exe
- Click on Configure.

Once configured, copy the Signature hash and Redirect URI as you will need to reference and use these later on.

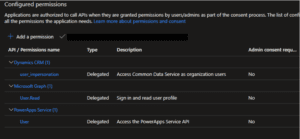
- Lastly, we need to grant our app registration certain API permissions. Go to API Permissions > Add a permission and grant the following:
- Microsoft APIs – Dynamics CRM
- APIs my organization uses – Azure API Connections and PowerApps Service
If you don’t find the permissions under APIs my organization uses, run the following PowerShell commands as appropriate, and try again:
Missing Azure API Connections permission:
Connect-AzureAD -TenantId <your tenant ID>
New-AzureADServicePrincipal -AppId fe053c5f-3692-4f14-aef2-ee34fc081cae -DisplayName “Azure API Connections”
Missing PowerApps Service permission:
Connect-AzureAD -TenantId <your tenant ID>
New-AzureADServicePrincipal -AppId 475226c6-020e-4fb2-8a90-7a972cbfc1d4 -DisplayName “PowerApps Service”
When you first access your app, you may be prompted to request approval as part of admin consent. If so, please talk to your administrator who will be able to review and approve this request on their end.
ALLOWING REGISTERED APPS IN YOUR ENVIRONMENT
We will also need to allow the app which is registered earlier in your Power Platform. To do this, we need to run some PowerShell cmdlets which is part of the Power Apps PowerShell module v2.0.144 and greater here.
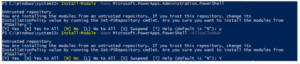
Open PowerShell with admin privileges and execute the following two commands.

Press Y or A to confirm the installation of the module
If you don’t have admin rights to your computer, you can also try the following cmdlets

Lastly, we need to execute the following command which will enable the registered app in Power Platform. Swap out <App ID> with the Client ID of your app registration in Azure. The Client ID is located in the Overview tab of your app registration.


You will be prompted to login and you will require tenant admin privileges. If you don’t have access, you may need to contact your administrator.

PART 2: INSTALLING WRAP IN YOUR ENVIRONMENT
For installing wrap in your you need to go to settings of your power apps environment there you have to click on resources and then on Dynamics 365 Apps

Click on Install app

Search and look for Wrap and click Next and click on Agree.


The app should start to install into the environment. But make sure you have admin rights for this.

PART 3: CONFIGURING APP CENTER
Whilst the app is installing, we will configure App Center. App Center is a platform that enables you to manage the lifecycle of your apps from automated builds, testing, distribution and monitoring. We will be using App Center to build our app into an APK file.
App Center provides a free plan that consists of 240 build minutes and pretty much what you need to get started. As your development scales up and you need test management or additional build time and pipelines, you can look to add on additional features.
First we need to create an Organisation. An organisation is simply a construct for managing users and their permissions across multiple apps.

Next, create an App which is a container to store all the artefacts relating to the application.

In the creation screen, fill in the necessary details related to your app. Give your app a name and release type. For OS, select Android if targeting Android and Custom for IOS. For Platform, select React Native regardless.

Once your organisation and app is created, go to settings where we will create an API token. The API token will be used to enable the Power Platform (PowerApps maker) to talk with App Center.

In the settings screen, look for App API tokens and click on the pencil icon.

Click on New API token

Provide a description, select Full Access and click on Add new API token.

You will be shown your token once so note it down somewhere safe. Click on Close.

The last thing to do is the record down the URL of your App Center application. Simply copy the URL from the browser.
Wrapping you Power Apps.
We will now wrap our app. I have a sample canvas app which I will be using for my testing.

In order to wrap your PowerApps, the app needs to be added to a solution. If you go to Apps, and open the context menu, you won’t get the Wrap option.

This is because the app needs to be solution aware. This is simple as we simply need to create a solution and add our app in.

Accessing the context menu, we can now see the Wrap option.

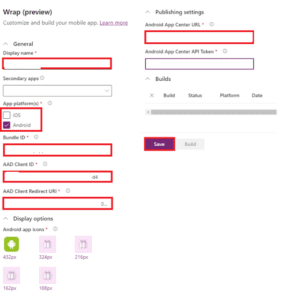
There’s a fair bit of information required here so let’s break it down.
Display name – display name of your app
App Platform(s) – select the platform you wish to target
Bundle ID – a unique identifier of your application within a platform’s app store ecosystem. A generic naming convention is com.{companyname}.{appname}
AAD Client ID – located on the overview tab when you created your AAD app registration.
AAD Client Redirect URI: located in the authentication tab of your AAD app registration.
Android App Center URL: the URL of your application within App Center. Simply browse to your app in App Center and copy the URL from the browser
Android App Center API Token: the API token generated earlier in your app settings
Click on Save to continue
Click on Build to start the build.


If we navigate back to our App Center, we should now see a new release of our app.

You can click on the link or scan the QR code from your phone to install it. Obviously for production workloads, you would be using a MDM like Intune or an app store for distribution.

PART# 04 : SIGNING YOU APPLICATION
Now at this point, you will probably get a App Not Installed error as Android requires all APKs to be digitally signed with a certificate before they can be installed or updated.
To sign the app, I used apksigner which is part of Android Studio. Here is a link to the reference article.
Open Android Studio settings and copy the Android SDK Location.

In this directory, we can see apksigner.bat

The syntax for signing an APK is as follows where we will specify a KeyStore file using the –ks option.

Running the command below will sign the APK which we can then install on our Android device.

After installing the APK, the app should appear just like any other app.

Starting the app, we can see a nice splash screen.

And we will be prompted to authenticate.

After authenticating, we can see our canvas app loading.

Final Words
That’s it, then. Our canvas app is now protected by a native Android wrapper. By doing this, numerous additional possibilities for branding and distribution-based UX customization become available. This functionality might help the Power Platform become more widely used.
Furthermore, if you have any questions or concerns, please feel free to share them in the comments section below. If you need further assistance, you can contact us or email us at info@kaispe.com.
Thankyou


