Welcome to our comprehensive guide on connecting OpenAI with Power Apps Canvas applications using custom connectors and Power Automate. In today’s digital age, businesses are constantly seeking innovative ways to enhance user experiences and streamline processes. By integrating OpenAI’s powerful language model with the robust capabilities of Power Apps and Power Automate, you can create intelligent and dynamic applications that leverage the potential of artificial intelligence.
In this blog, we will walk you through the step-by-step process of connecting OpenAI with Power Apps. It will enable you to harness the full potential of natural language processing in your custom applications. Whether you’re a developer or a business user, this guide will equip you with the knowledge and tools. It will help you build sophisticated and intelligent applications that can revolutionize the way you interact with your users. Let’s dive in and unlock the possibilities of OpenAI combined with Power Apps and Power Automate!
SUPERCHARGING OPENAI WITH AZURE COGNITIVE SERVICES: (INTEGRATING ENDPOINTS AND KEYS):
Azure Cognitive Services provides a powerful and comprehensive suite of AI services that can seamlessly integrate with OpenAI endpoints and keys. With Azure Cognitive Services, you can augment the capabilities of OpenAI’s language model by leveraging a wide range of AI functionalities, including computer vision, speech recognition, text analytics, and more. By combining the strengths of OpenAI and Azure Cognitive Services, you can enhance the intelligence and capabilities of your applications.
Azure Cognitive Services simplifies the process of integrating AI into your applications by providing pre-built APIs and SDKs that enable easy integration and access to various AI capabilities. Whether you need to analyze images, convert speech to text, extract key insights from text data, or translate languages, Azure Cognitive Services has the tools and services to support your requirements.
To connect OpenAI with Azure Cognitive Services, you can utilize the OpenAI endpoint and key as part of the authentication and authorization process. By securely integrating your OpenAI endpoint and key with Azure Cognitive Services, you can leverage the combined power of both platforms. It helps you create intelligent, AI-driven applications that deliver enhanced user experiences and optimize business processes.
Whether you’re developing a chatbot, creating a recommendation engine, or building a sophisticated language processing application, the integration of OpenAI with Azure Cognitive Services provides a robust foundation for leveraging the capabilities of both platforms. Unlock the potential of AI. Elevate your applications to new heights by harnessing the collaborative power of OpenAI and Azure Cognitive Services.
Following are some steps for creating custom connector for integrative Azure Open AI with power apps application through power automate:
STEP 1: SIGN IN TO THE POWER PLATFORM
Access the Power Platform admin center by visiting https://make.powerapps.com/ and signing in with your Microsoft account.
STEP 2: NAVIGATE TO THE CUSTOM CONNECTORS SECTION
Once you’re in the admin center, navigate to the “Environments” tab. And select the environment where you want to create the custom connector. Then, click on “More” in the left-hand navigation menu and click on discover all and then select “Custom connectors.”
STEP 3: CREATE A NEW CUSTOM CONNECTOR
Click on the “New custom connector” button to start the process of creating a new custom connector.

STEP 4: SPECIFY THE CONNECTOR DETAILS
Fill in the required details for your custom connector, such as the name, description, and Host. You can also provide optional information like the base URL and authentication requirements, depending on the OpenAI API you are using.

STEP 5: CONFIGURE AUTHENTICATION
In the “Security” tab, configure the authentication for your custom connector. Depending on the OpenAI API, you can leave it as it or you can also try the api authentication.

STEP 6: DEFINE ACTIONS AND TRIGGERS
In the “General” tab of the custom connector editor, define the actions and triggers that will be available for your Power Apps application. These actions and triggers represent the operations you can perform with OpenAI, such as generating text or analyzing sentiment.


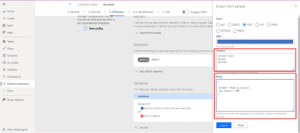
STEP 7: DEFINE CONNECTOR BEHAVIOR
Under the “Definition” tab, define the connector behavior by specifying the request and response formats, including headers, parameters, and sample responses. This information will help Power Apps understand how to interact with the OpenAI API.

STEP 8: TEST THE CUSTOM CONNECTOR
After defining the connector behavior, use the “Test” tab to ensure that your custom connector is functioning correctly. You can simulate requests and examine the responses to validate the integration with OpenAI.


STEP 9: SAVE AND PUBLISH THE CUSTOM CONNECTOR
Once you’re satisfied with the configuration and testing, save your custom connector. You can choose to either save it as a draft or publish it immediately, making it available for use in Power Apps.
STEP 10: USE THE CUSTOM CONNECTOR IN POWER APPS
Finally, in your Power Apps Canvas application, go to the “Data” tab and click on “Custom connectors.” Select your newly created custom connector, and you can start using it to integrate OpenAI’s capabilities into your app’s functionality.
STEP 11: CREATE A NEW BUTTON FLOW IN POWER AUTOMATE
Sign into Power Automate (flow.microsoft.com) using your Microsoft account. Click on “My flows” and then select “New” to create a new flow.
STEP 12: SET UP A TRIGGER FOR THE FLOW
Choose an appropriate trigger for your flow. For example, you can use the “Power Apps” trigger. And select the Canvas app’s action that captures the user’s input prompt.

STEP 13: ADD AN ACTION TO CALL THE CUSTOM CONNECTOR
Search for the custom connector you created for OpenAI and add the action that corresponds to the desired functionality, such as generating text based on the prompt. Configure any necessary input parameters, including the user’s prompt captured from the Canvas app’s trigger.

STEP 14: HANDLE THE RESPONSE FROM THE CUSTOM CONNECTOR
After calling the custom connector, you’ll receive a response. Add the appropriate actions to parse and extract the desired body from the response. This may involve using dynamic content or expressions to access the relevant fields.

STEP 15: OUTPUT THE BODY TO A TEXTBOX IN POWER APPS
Add an action to update the value of the desired textbox in Power Apps. Use the output from the previous step and map it to the appropriate field in the textbox, ensuring the body is displayed correctly.

STEP 16: SAVE AND TEST THE FLOW
Save the flow and give it a meaningful name. You can then test the flow by triggering it using the specified trigger, either manually or by interacting with the associated Power Apps Canvas application.
STEP 17: PUBLISH THE FLOW
Once you have tested and validated the flow’s functionality, you can publish it to make it available for use by others.
STEP 18: USE THE FLOW IN POWER APPS APPLICATION
Add a textbox on screen in power apps application which will play the role of prompt and the user will enter the question or query in that textbox. After inserting the question, the user will press the submit button which will initiate the flow. And it will retrieve the ans from open ai in the ans textbox below the question textbox portrayed in following images.

STEP 18: PLACE BUTTON FOR INITIATING THE FLOW:
After entering the question in the textbox, you can press the button. After pressing, that button will fetch the question and pass it into the button which was created previously. And that flow will also fetch the output from open ai into the answer textbox. We just have to save the flow result into a variable and will pass that variable into the answer textbox.


CONCLUSION:
In conclusion, connecting OpenAI with Power Apps Canvas applications using custom connectors and Power Automate opens up a world of possibilities for creating intelligent and dynamic applications.
By integrating the power of natural language processing provided by OpenAI’s language model with the robust capabilities of Power Apps and Power Automate, businesses can revolutionize the way they interact with users and streamline processes. Throughout this guide, we have walked you through the step-by-step process of creating a custom connector for OpenAI. It will allow you to harness the full potential of artificial intelligence. We have also demonstrated how to use the custom connector in Power Automate to fetch the desired body, taking user prompts from a Power Apps Canvas application, and outputting the result into a textbox. Consequently, with this integration, you can leverage OpenAI’s language model to generate text, analyze sentiment, and perform a wide range of natural language processing tasks. All are seamlessly integrated into your Power Apps applications.
Whether you’re a developer or a business user, this guide equips you with the knowledge and tools. It helps you build sophisticated and intelligent applications that enhance user experiences and optimize workflows. The combination of OpenAI, Power Apps, and Power Automate empowers businesses to create innovative and AI-powered solutions that can drive productivity, efficiency, and customer satisfaction. By tapping into the power of natural language processing, you can create applications that understand and respond intelligently to user inputs, providing personalized and context-aware experiences.
Furthermore, if you have any questions or concerns, please feel free to share them in the comments section below. If you need further assistance, you can contact us or email us at info@kaispe.com.
Thankyou


